Dec 6, 2022
How Can Kobiton x Guardsquare Help You Achieve A More Secure Mobile Application?

Adam Creamer
Read More
Cypress is a modern front-end testing tool to provide a unified testing environment for web applications. In contrast to other end-to-end testing tools, Cypress does not execute remote commands through the network and executes in the same run-loop as your application.
Cypress is designed to be compatible with a Test-Driven development environment where development and testing happen organically. This compatibility leads to a faster and more agile development process. One of Cypress’s major advantages over other testing frameworks is that it is an all in one solution with assertion, mocking and stubbing, etc. It supports all these things while allowing users to write tests in plain old JavaScript.
In this article, let’s look at how to utilize Cypress when handing test events for the most common test requirements, simple UI interactions, cookie management, and capturing URL requests.
To learn more about all-in-one testing framework, contact Kobiton today!
The Cypress Advantage
To experience the convenience of creating tests using Cypress, let’s go ahead with creating a simple test to visit the Google search engine and type the word hello in the search box there.
describe('Testing Google Search', () => {

it('Using Google Search', () => {

cy.visit('https://www.google.com')
 br>cy.get('.gLFyf').type('Hello', {delay: 1000}).should('have.value', 'Hello')

})

})
RESULT
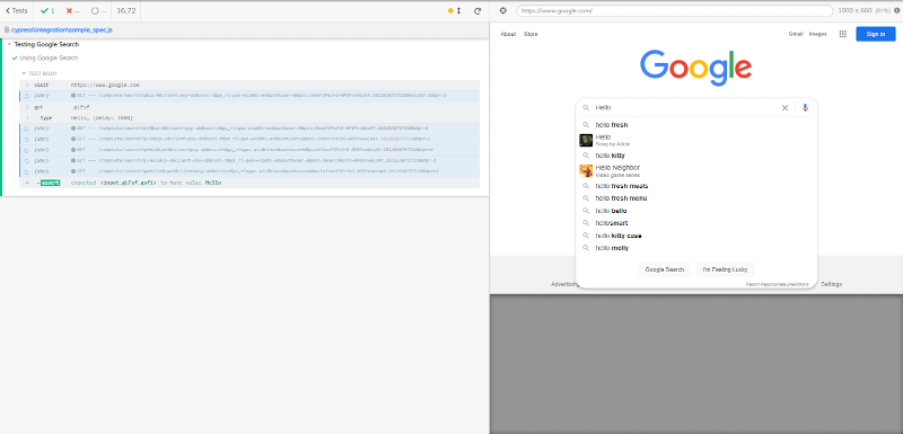
In the code block above, you have specified Cypress using the beforeEach function to navigate to the search engine before continuing with the test case. Then, you will select the search box and enter the value “Hello” with a delay between each character input. Finally, you have to assert using the should() command, if the entered value is equal to “Hello”.
The Beauty of Cypress is that you don’t have to worry about importing libraries for ant tasks such as creating test cases, assertions, or making complex configurations to include browsers in testing. Everything comes integrated with Cypress.
An important thing to note here is that even though you can use Cypress to test live web applications, it is more suited for handling day to day testing in local environments. Using Cypress for production testing is inappropriate as it is not a general-purpose web automation tool.
Now you know the basic structure of a cypress test. Let’s see how to use cypress when developing a web application.
Since Cypress is not limited to a specific framework, it can be used for testing any web application. The key points to remember are the “get()” and “contains()” commands, which are the base of any UI interaction and can be used to find the required elements easily. The “should()” and “and()” commands are used in all the assertions.
Let’s understand this further using a practical example. Here, you will be testing the login functionality of a web page.
First, let’s create two test cases as one for testing the login functionality with valid details and the other for testing the error message with invalid details.
describe('Testing Login', () => {
beforeEach(() => {
cy.visit('/admin');
})
it('Enter Correct Details', () => {
// Get Form
cy.get('form');
// Assert Input Data
cy.get('#id_username')
.type('admin')
.should('have.value', 'admin');
cy.get('#id_password')
.type('admin')
.should('have.value', 'admin');
// Submit Data
cy.get('form').submit()
})
it('Enter Incorrect Details', () => {
// Get Form
cy.get('form');
// Assert Input Data
cy.get('#id_username')
.type('admin')
.should('have.value', 'admin');
cy.get('#id_password')
.type('admin1234')
.should('have.value', 'admin1234');
// Submit Data
cy.get('form').submit()
// Check Error Message
cy.get('.errornote')
.should('be.visible')
.and('contain.text', 'Please enter the correct username and password')
})
})
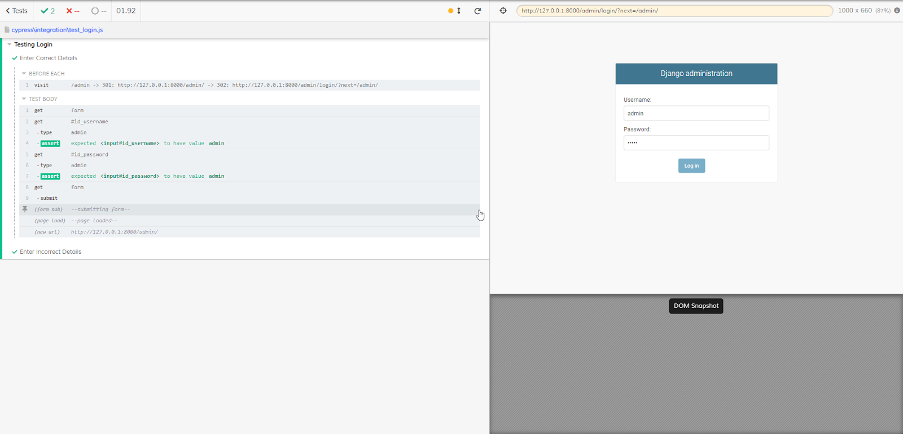
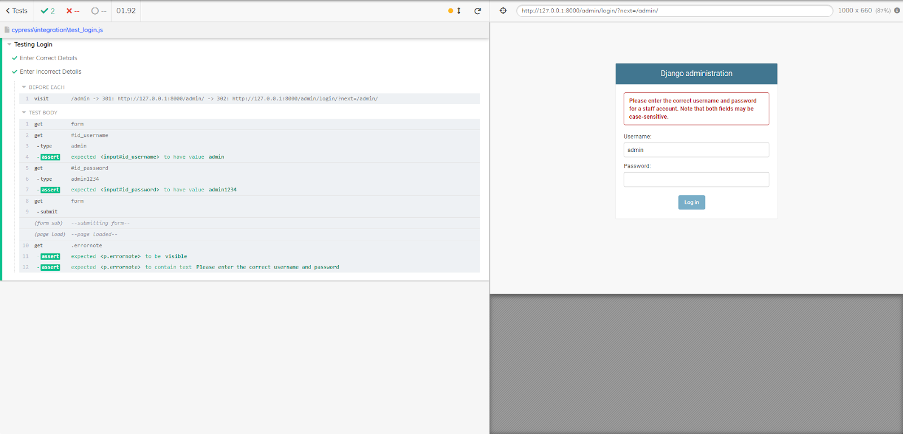
In the above code block, the get() command is used to point to the login form and get the text fields. Then, type() command is used to enter the required details, and should() is used to assert the values. Finally, the form is submitted as a whole. The differentiation comes after submission when a set of incorrect details are entered, and an error message should be generated. You can test this by asserting if the error message block is visible and contains the given text.
The beforeEach function is used to navigate to the login page before each test. It is important to include all the user interaction scenarios for creating a comprehensive test. Following is the output generated by the test cases.
Test – Enter Correct Details
Test – Enter Incorrect Details
Cypress simplifies the process of interacting with UI elements by providing a robust set of functionalities and a comprehensive test interface to capture all the steps of a test case.
In situations where testing involves authentication, you have to keep the session data or else you will have to integrate login steps in each test case. Remember the test case you created in the above section to check the login functionality. You can utilize the same code to capture the session cookies that would store the authentication details and use those cookies in all the other test cases.
Cypress provides the before() function to execute any code once before continuing the test where you have set up the user login. Next, using the beforeeach() function, you can capture the session cookies using their names (cookie names will vary from application to application). This will preserve the cookies for each test.
describe('Create Author', () => {
before(() => {
// Login one before running the tests
cy.visit('/admin');
// Get Form
br>cy.get('form');
// Assert Input Data
cy.get('#id_username').type('admin')
.should('have.value', 'admin');
cy.get('#id_password').type('admin')
.should('have.value', 'admin');
cy.get('form').submit();
})
beforeEach(() => {
// Preserve the Cookies
Cypress.Cookies.preserveOnce('sessionid', 'csrftoken');
})
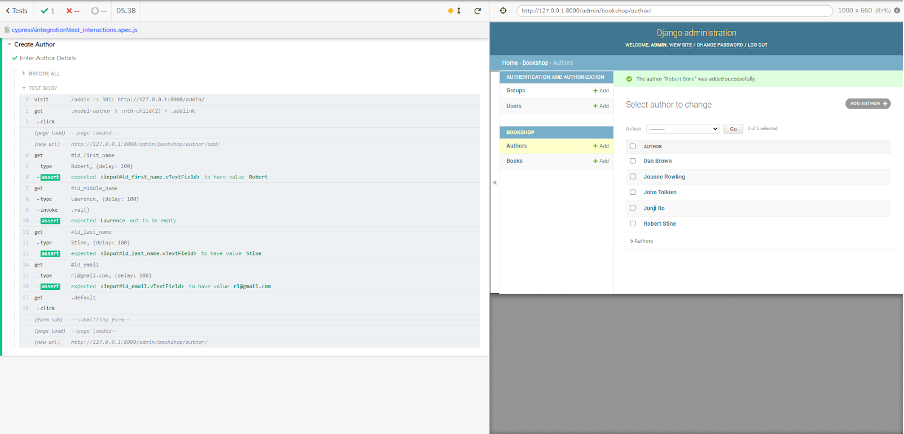
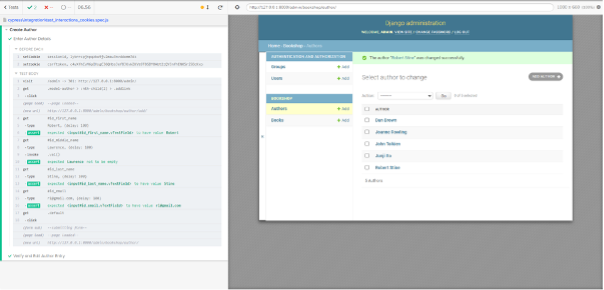
it('Enter Author Details', () => {
cy.visit('/admin');
cy.get('.model-author > :nth-child(2) > .addlink').click();
cy.get('#id_first_name').type('Robert', {delay: 100})
.and('have.value', 'Robert');
cy.get('#id_middle_name').type('Lawrence', {delay: 100})
.invoke('val').should('not.be.empty');
cy.get('#id_last_name').type('Stine', {delay: 100})
.should('have.value', 'Stine');
cy.get('#id_email').type('rl@gmail.com', {delay: 100})
.should('have.value', 'rl@gmail.com');
cy.get('.default').click();
})
})
RESULT
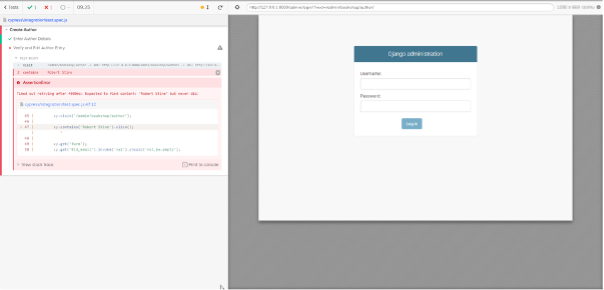
As you have preserved the cookies, now you can create multiple tests that utilize the same cookie data. After successfully creating a new author record, you can create a separate test to locate the record and edit the email field. So let’s go ahead and create a new test to edit the record as shown below.
it('Verify and Edit Author Entry', () => {
cy.visit('/admin/bookshop/author');
cy.contains('Robert Stine').click();
cy.get('form');
cy.get('#id_email').invoke('val').should('not.be.empty');
cy.get('#id_email').clear();
cy.get('#id_email').type('rl123@gmail.com', {delay: 100})
.should('have.value', 'rl123@gmail.com');
cy.get('form').submit();
})
RESULT

In the above instance, if you specified the same test without preserving the cookies, it will lead to an AssertionError as you will be required to log in again to navigate to the correct path.
Another way of setting cookies is by specifying them explicitly. Cypress offers inbuilt functionality to manage cookies. First, let’s discuss how to obtain cookie data using Cypress. In the following login test, you can identify if any cookies are created and the properties of individual cookies using getCookies() and getCookie() commands.
describe('Testing Login Cookies', () => {
it('Enter Correct Details', () => {
cy.visit('/admin');
// Get form
cy.get('form');
// Assert input data
cy.get('#id_username')
.type('admin')
.should('have.value', 'admin');
cy.get('#id_password')
.type('admin')
.should('have.value', 'admin');
// Submit data
cy.get('form').submit();
// Check if any cookies are created
cy.getCookies().should('not.be.empty')
.and('have.length', 2);
// Identify each cookie
cy.getCookie('sessionid').should('exist')
.then((cookies) => {
expect(cookies).to.have.property('name', 'sessionid'),
expect(cookies).to.have.property('domain', '127.0.0.1')
});
cy.getCookie('csrftoken').should('exist')
.then((cookies) => {
expect(cookies).to.have.property('name', 'csrftoken'),
expect(cookies).to.have.property('domain', '127.0.0.1')
});
cy.visit('/admin/bookshop/book');
})
})
RESULT
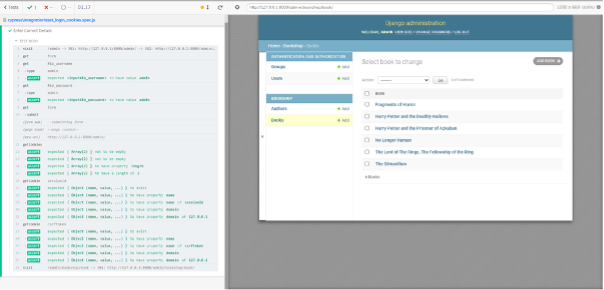
The test results indicate that two cookies were created (Array Length) and the properties of each cookie. You can manually set the cookie values in instances where the developer knows the details of the cookies. In the below example, you can set the “sessionid” and “csrftoken” cookies to bypass the need for login.
describe('Test Manual Cookie Config', () => {
it('Set Cookies', () => {
// Set cookies
cy.setCookie('sessionid','lybrrcpjnpqzko9jv2mau3nvddomm7dz');
cy.setCookie('csrftoken','c4yXfhCvM6pIHygCJ6QHbsJef8JKvWZKVs9T8SBYOAbt2zQYJnfhENXSrj5OcKxo');
// Check cookie values
cy.getCookie('sessionid').should('exist')
.then((cookies) => {
expect(cookies).to.have.property('name', 'sessionid'),
expect(cookies).to.have.property('value', 'lybrrcpjnpqzko9jv2mau3nvddomm7dz'),
expect(cookies).to.have.property('domain', '127.0.0.1')
});
cy.getCookie('csrftoken').should('exist')
.then((cookies) => {
expect(cookies).to.have.property('name', 'csrftoken'),
expect(cookies).to.have.property('value', 'c4yXfhCvM6pIHygCJ6QHbsJef8JKvWZKVs9T8SBYOAbt2zQYJnfhENXSrj5OcKxo'),
expect(cookies).to.have.property('domain', '127.0.0.1')
});
cy.visit('/admin/bookshop/book');
})
})
RESULT
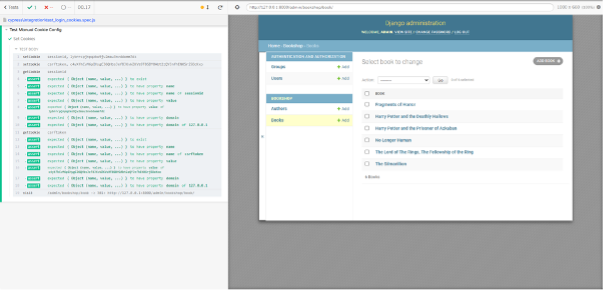
You can integrate a similar code block as the above for beforeeach() function to manually configure the cookies. This will eliminate the need for the before() function to carry out login to capture the generated cookies.
When it comes to global environment variables, the best practice is to create variables in a .env file before continuing. In the following example, you will create a “cypress.env.json” file to put the cookie data.
cypress.env.json
{

"sessionid_value": "lybrrcpjnpqzko9jv2mau3nvddomm7dz",

"csrftoken_value": "c4yXfhCvM6pIHygCJ6QHbsJef8JKvWZKVs9T8SBYOAbt2zQYJnfhENXSrj5OcKxo"

}
These values can be called using the Cypress.env() command and Cypress will automatically detect any configured variables in “cypress.env.json” or “cypress.json” files. However, it’s recommended to create a separate file for environment variables.
describe('Create Author', () => {

beforeEach(() => {

// Set the Cookies

cy.setCookie('sessionid', Cypress.env('sessionid_value'));

cy.setCookie('csrftoken', Cypress.env('csrftoken_value'));

})


it('Enter Author Details', () => {

// User Interactions

})

it('Verify and Edit Author Entry', () => {

// User Interactions

})

})
RESULT
To remove cookies, you can use either clearCookie() function to remove an individual cookie or clearCookies() function to remove all the cookies in the current domain and subdomain.
it('Remove Cookies', () => {

// Clear a single cookie

cy.clearCookie('sessionid');

cy.getCookie('sessionid').should('not.exist');


// Clear all the cookies

cy.clearCookies();

cy.getCookies().should('be.empty')

.and('have.length', 0);

})
RESULT
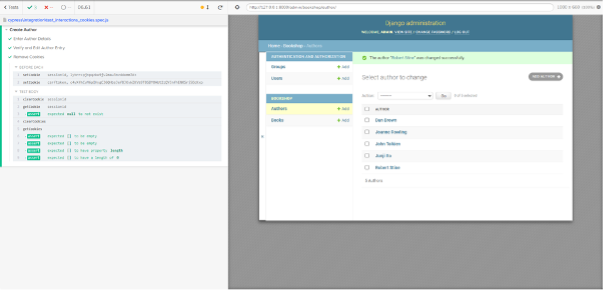
Now you have a basic understanding of how to utilize cookies in testing. In the coming section, let’s see how to intercept requests.
The intercept functionality in Cypress helps developers to learn the way data is captured and transferred. It also helps debug data irregularities while understanding the HTTP request and response structure of a web application.
Furthermore, intercepting HTTP requests allows users to intercept any HTTP request and act upon the captured request. In the next example, you will intercept a simple GET request which is used to navigate to the “Add book” form.
describe('Create Book', () => {
beforeEach(() => {
// Set the Cookies
cy.setCookie('sessionid', Cypress.env('sessionid_value'));
cy.setCookie('csrftoken', Cypress.env('csrftoken_value'));
})
it('Navigate to Add book', () => {
cy.visit('/admin/bookshop');
// Setup the intercept
cy.intercept('GET', '**/add/').as('addBook')
// Trigger the GET request
cy.get('.model-book > :nth-child(2)').click();
// Receive the response code
cy.wait('@addBook').its('response.statusCode').should('be.oneOf', [200, 301, 302])
})
})
RESULT
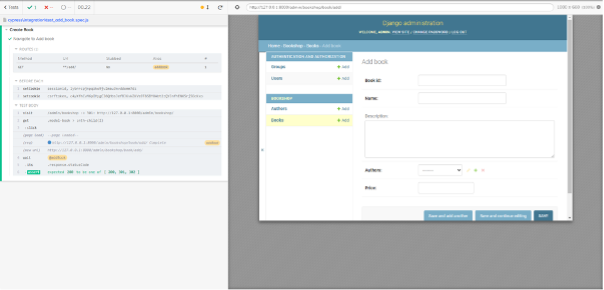
In the intercept command, it is specified to capture any GET request which will contain “/add/” at the end of the URL and configured an alias called “addBook”. This alias will be used to refer to the captured URL. Then you can trigger the request by clicking on the “add” link. Using the wait command, you will wait until the request is completed and assert the request by matching the response code with a successful response code.
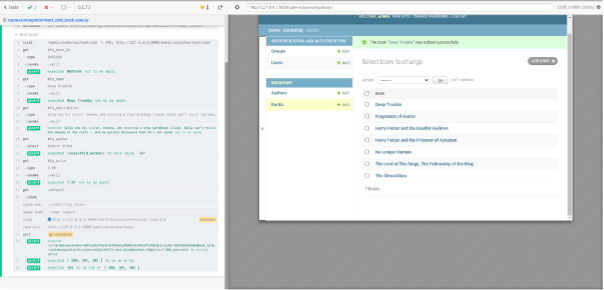
Now, let’s see how to capture the data of a POST request. You will be capturing the POST request of a form submission when creating a new book record.
it('Create a new book record', () => {
cy.visit('/admin/bookshop/book/add');
cy.intercept('POST', '**/add/').as('createBook')
cy.get('#id_book_id').type('BK05565').invoke('val').should('not.be.empty')
cy.get('#id_name').type('Deep Trouble').invoke('val').should('not.be.empty')
cy.get('#id_description')
.type("Billy and his sister, Sheena, are visiting a tiny Caribbean island. Billy can't resist the beauty of the reefs -- and he quickly discovers that he's not alone")
.invoke('val').should('not.be.empty')
cy.get('#id_author').select('Robert Stine').should('have.value', '39')
cy.get('#id_price').type('7.99').invoke('val').should('not.be.empty')
cy.get('.default').click()
// Individual interruption captures
//cy.wait('@createBook').its('request.body').should('include', 'price')
//cy.wait('@createBook').its('response.statusCode').should('be.oneOf', [200, 301, 302])
// Capture all the details
cy.wait('@createBook').then((interception) => {
expect(interception.request.body).to.include('price')
expect(interception.response.statusCode).to.be.oneOf([200, 301, 302])
})
})
According to the above example, you have configured an interrupt to capture any POST request containing the “/add/” at the end of the URL. Then, you need to fill the form with the correct details and trigger the POST request by saving the form.
You have two options for capturing data. One is to use the wait() function to capture individual parts of the POST request as shown in the “Individual interruption” segment of the above code block. However, the better way is the second option which is to capture all the details in the request including the response data. That will allow you to assert multiple values to increase the coverage of the test case. The following screenshot demonstrates how to assert multiple parameters of a POST request.
In this article, you have discovered some outstanding functionality offered by Cypress.io. Having an all-in-one testing framework makes the lives of developers and testers easier by not having to worry about combining multiple tools and troubleshooting configuration errors caused by them. It will also lead to faster development and testing cycles.
Looking for an all-in-one testing framework?