Apr 24, 2020
How to Upload Apps into KOBITON by Using POSTMAN

Adam Creamer
Read More
Continuous Integration (CI) and Continuous Delivery (CD) bridges the gap between software development and other operations by automating various processes such as building, testing, and deployment of software. In simple terms, Continuous Integration streamlines the process of continuous development of software.
Looking to become an Appium expert?
In agile development, incremental changes are made to the codebase, and then the code is built, tested, and packaged. CI helps to automate this whole process. Finally, Continuous Delivery will manage the deployment of the software packages delivered from the CI process to their relevant environments, such as testing or production.
In an increasingly mobile-driven world, there is a need to integrate CI/CD process into mobile application development. This can be done by combining testing frameworks like Appium, Espresso, and XCTest with Continuous Integration tools such as Jenkins, Travis CI, and GitLab CI/CD. This article will focus on how to integrate Appium tests with Jenkins for automating the testing process.
Appium is an open-source, cross-platform test automation tool for native or hybrid mobile/web applications built for iOS, Android, and Windows desktop platforms. It utilizes vendor-provided testing frameworks for each platform and wraps them in the WebDriver API. This offers developers the freedom to write tests in any of their preferred programming languages or test frameworks that are compatible with WebDriver. Refer to the Appium Github documentation for more information on the Appium tool.
Jenkins is a leading open-source automation platform that can be used to automate the building, testing, and deployment of software. Due to its self-contained nature, Jenkins can be installed in all major platforms and even supports containerized deployment. With its extensive plugin library, Jenkins provides integrations with multiple platforms and enables to build custom plugins easily to support new tools and platforms.
Before moving to the integration process, we need to have the proper software and tools installed and configured. For this tutorial, we will be using a windows environment to integrate Appium Tests for the android platform in a Jenkins pipeline.
The following is a list of required software and tools:
Eclipse IDE
We will be using Eclipse IDE with Maven and TestNG installed and configured to create the test cases.
Appium
The Appium Test Server should be installed and running. (Android SDK is required to be installed and configured to emulate the android device. This can be done through Android Studio)
Jenkins
Jenkins should be installed and available through the web interface.
Additionally, you should possess a basic understanding of each of the above tools, their basic configurations, and concepts to follow this tutorial.
In this section, we will create a test case to perform a simple calculation using the built-in android calculator application. Following are the steps to integrate the Appium test into the Jenkins pipeline.
Create a Maven Project
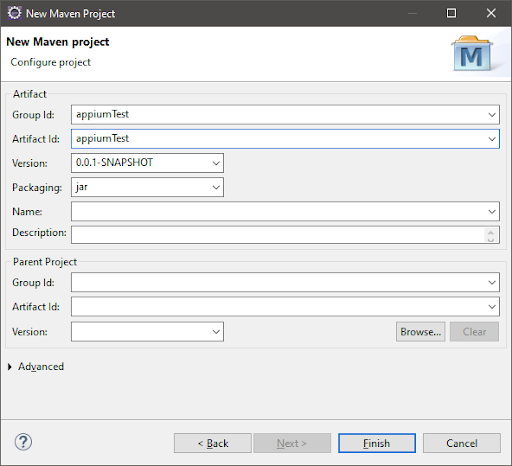
The first step will be to create a Maven Project in Eclipse.
File -> New -> Maven Project -> Enter the Project Details (The name of the project will be appiumTest in this example)
Now, we have a project. The next step is to create the Classes and Test Cases. We will edit the pom.xml file to include the dependencies for Appium and TestNG.
pom.xml
| <project xmlns=”http://maven.apache.org/POM/4.0.0″ xmlns:xsi=”http://www.w3.org/2001/XMLSchema-instance” xsi:schemaLocation=”http://maven.apache.org/POM/4.0.0 https://maven.apache.org/xsd/maven-4.0.0.xsd”> <modelVersion>4.0.0</modelVersion> <groupId>appiumTest</groupId> <artifactId>appiumTest</artifactId> <version>0.0.1-SNAPSHOT</version> <dependencies> <dependency> <groupId>io.appium</groupId> <artifactId>java-client</artifactId> <version>7.4.0</version> </dependency> <dependency> <groupId>org.testng</groupId> <artifactId>testng</artifactId> <version>7.1.0</version> </dependency> </dependencies> </project> |
Then, we have to create a package called “baseClass” and the “BaseClass.java” file within that package. This will initiate the connection to the Appium driver and emulate the android device.Create the Appium Connection
BaseClass.java
| package baseClass; import java.net.MalformedURLException; import java.net.URL; import java.util.concurrent.TimeUnit; import org.openqa.selenium.remote.DesiredCapabilities; import org.testng.annotations.BeforeTest; import org.testng.annotations.Parameters; import io.appium.java_client.AppiumDriver; import io.appium.java_client.MobileElement; public class BaseClass { public static AppiumDriver<MobileElement> driver; @BeforeTest @Parameters({“deviceName”,”udid”, “platformVersion”,”url”}) public void setup(String deviceName, String udid,String platformVersion,String url) throws InterruptedException, MalformedURLException { DesiredCapabilities cap=new DesiredCapabilities(); cap.setCapability(“deviceName”, deviceName); cap.setCapability(“udid”, udid); cap.setCapability(“appActivity”, “com.android.calculator2.Calculator”); cap.setCapability(“appPackage”, “com.android.calculator2”); cap.setCapability(“platformName”, “Android”); cap.setCapability(“platformVersion”, platformVersion); driver=new AppiumDriver<MobileElement>(new URL(url), cap); driver.manage().timeouts().implicitlyWait(15, TimeUnit.SECONDS); Thread.sleep(5000); } } |
Next, we have to create the interactions with the emulated device. For that, we will create a separate package called “pages” and two java files inside that package.
BasePOMpage.java – To initialize the elements.
CalculatorScreen.java – To identify the elements and create functions. We will be creating functions to initialize the button-click events.
BasePOMpage.java
| package pages; import org.openqa.selenium.support.PageFactory; import io.appium.java_client.AppiumDriver; import io.appium.java_client.MobileElement; import io.appium.java_client.pagefactory.AppiumFieldDecorator; public class BasePOMpage { public AppiumDriver<MobileElement> driver; public BasePOMpage(AppiumDriver<MobileElement> driver) { this.driver = driver; PageFactory.initElements(new AppiumFieldDecorator(driver), this); } } |
CalculatorScreen.java
| package pages; import io.appium.java_client.AppiumDriver; import io.appium.java_client.MobileElement; import io.appium.java_client.android.AndroidElement; import io.appium.java_client.pagefactory.AndroidFindBy; public class CalculatorScreen extends BasePOMpage{ @AndroidFindBy(id = “com.android.calculator2:id/digit_1”) private AndroidElement button1; @AndroidFindBy(id = “com.android.calculator2:id/digit_2”) private AndroidElement button2; @AndroidFindBy(id = “com.android.calculator2:id/digit_3”) private AndroidElement button3; @AndroidFindBy(id = “com.android.calculator2:id/digit_4”) private AndroidElement button4; @AndroidFindBy(id = “com.android.calculator2:id/digit_5”) private AndroidElement button5; @AndroidFindBy(id = “com.android.calculator2:id/digit_6”) private AndroidElement button6; @AndroidFindBy(id = “com.android.calculator2:id/digit_7”) private AndroidElement button7; @AndroidFindBy(id = “com.android.calculator2:id/digit_8”) private AndroidElement button8; @AndroidFindBy(id = “com.android.calculator2:id/digit_9”) private AndroidElement button9; @AndroidFindBy(id = “com.android.calculator2:id/digit_0”) private AndroidElement button0; @AndroidFindBy(id = “com.android.calculator2:id/op_add”) private AndroidElement buttonPlus; @AndroidFindBy(id = “com.android.calculator2:id/eq”) private AndroidElement buttonEqual; public CalculatorScreen(AppiumDriver<MobileElement> driver) { super(driver); } // Click Button 1 (Digit 1) public void clickButton_1() { button1.click(); } // Click Button 2 (Digit 2) public void clickButton_2() { button2.click(); } // Click Plus Button(+) public void clickPlusButton() { buttonPlus.click(); } } |
Now it’s time to create our tests. Create a new package called “testScripts” and a file called “TestScript1.java” to write a simple test case to test the “addition” functionality of the android calculator.
TestScript1.java
| package testScripts; import org.testng.annotations.Test; import baseClass.BaseClass; import pages.CalculatorScreen; public class TestScript1 extends BaseClass { @Test public void setup() throws InterruptedException { CalculatorScreen cs = new CalculatorScreen(driver); // Click Digit 1 cs.clickButton_1(); // Click on Add (+) cs.clickPlusButton(); // Click Digit 2 cs.clickButton_2(); Thread.sleep(5000); } } |
Next, we have to create the test configuration file for TestNG. Simply create a new file named “testing.xml” and include the parameters required for the emulator (deviceName, udid, platformVersion, url).
testing.xml
| <?xml version=”1.0″ encoding=”UTF-8″?> <!DOCTYPE suite SYSTEM “http://testng.org/testng-1.0.dtd” > <suite name=”parallel”> <test name=”Device-1″> <parameter name=”deviceName” value=”emulator-5554″ /> <parameter name=”udid” value=”emulator-5554″ /> <parameter name=”platformVersion” value=”9.0″ /> <parameter name=”url” value=”http://0.0.0.0:4723/wd/hub” /> <classes> <class name=”testScripts.TestScript1″/> </classes> </test> <!– Test –> </suite> <!– Suite –> |
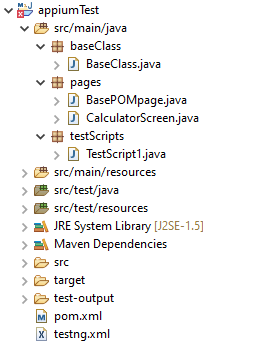
The appiumTest project will contain the following folder and file structure:
 To run the test case, right-click on testing.xml and click Run As -> TestNG Suite.
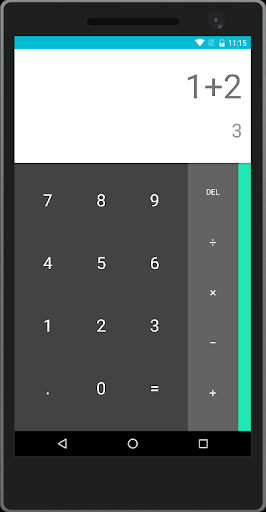
 It will run the test case, and the android emulator will display the following output.
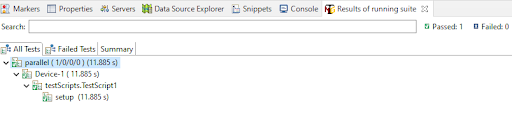
The TestNG console will provide a success message, as shown below.
Now comes the complex part, which is running this test as a Maven test. For that, we need to modify the pom.xml file, as shown below. We will also have to add the other dependencies and build plugins that are required for the project and test case. When adding the dependencies, make sure to select the correct versions of all the dependencies and plugins. Check the Maven Repository to find out the required libraries and plugins.
pom.xml
| <project xmlns=”http://maven.apache.org/POM/4.0.0″ xmlns:xsi=”http://www.w3.org/2001/XMLSchema-instance” xsi:schemaLocation=”http://maven.apache.org/POM/4.0.0 http://maven.apache.org/xsd/maven-4.0.0.xsd”> <modelVersion>4.0.0</modelVersion> <groupId>appiumTest</groupId> <artifactId>appiumTest</artifactId> <version>0.0.1-SNAPSHOT</version> <name>appiumTest</name> <url>http://maven.apache.org</url> <properties> <project.build.sourceEncoding>UTF-8</project.build.sourceEncoding> </properties> <repositories> <repository> <id>spring-releases</id> <name>Spring Releases</name> <url>https://repo.spring.io/libs-release</url> </repository> </repositories> <pluginRepositories> <pluginRepository> <id>spring-releases</id> <name>Spring Releases</name> <url>https://repo.spring.io/libs-release</url> </pluginRepository> </pluginRepositories> <dependencies> <dependency> <groupId>org.junit.jupiter</groupId> <artifactId>junit-jupiter-api</artifactId> <version>5.6.3</version> <scope>test</scope> </dependency> <dependency> <groupId>io.appium</groupId> <artifactId>java-client</artifactId> <version>7.4.0</version> </dependency> <dependency> <groupId>org.testng</groupId> <artifactId>testng</artifactId> <version>7.1.0</version> </dependency> <dependency> <groupId>org.apache.commons</groupId> <artifactId>commons-math3</artifactId> <version>3.5</version> </dependency> <dependency> <groupId>org.springframework</groupId> <artifactId>spring-tx</artifactId> <version>5.2.13.RELEASE</version> </dependency> <dependency> <groupId>org.springframework</groupId> <artifactId>spring-orm</artifactId> <version>5.2.13.RELEASE</version> </dependency> <dependency> <groupId>commons-lang</groupId> <artifactId>commons-lang</artifactId> <version>2.6</version> </dependency> <dependency> <groupId>org.apache.commons</groupId> <artifactId>commons-lang3</artifactId> <version>3.11</version> </dependency> <dependency> <groupId>org.seleniumhq.selenium</groupId> <artifactId>selenium-remote-driver</artifactId> <version>3.141.0</version> </dependency> <dependency> <groupId>org.seleniumhq.selenium</groupId> <artifactId>selenium-java</artifactId> <version>3.141.0</version> </dependency> </dependencies> <build> <plugins> <!– Compiler plug-in –> <plugin> <groupId>org.apache.maven.plugins</groupId> <artifactId>maven-compiler-plugin</artifactId> <configuration> <source>1.8</source> <target>1.8</target> </configuration> </plugin> <!– Below plug-in is used to execute tests –> <plugin> <groupId>org.apache.maven.plugins</groupId> <artifactId>maven-surefire-plugin</artifactId> <version>2.22.1</version> <configuration> <suiteXmlFiles> <!– TestNG suite XML files –> <suiteXmlFile>testng.xml</suiteXmlFile> </suiteXmlFiles> </configuration> </plugin> </plugins> </build> </project> |
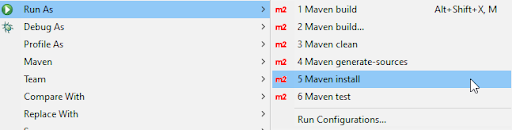
Now let’s run this test by right-clicking on the pom.xml file and then clicking Run As -> Maven install.
It will download the required dependencies and plugins, build the project, and run the test case. A successful build will indicate the “BUILD SUCCESS” message in the console.

For configuring the Jenkins pipeline, navigate to the Jenkins Web Interface and create a “New Item”. For the purpose of this tutorial, we have installed the Jenkins server on a Windows environment, which is accessible on http://localhost:8080/
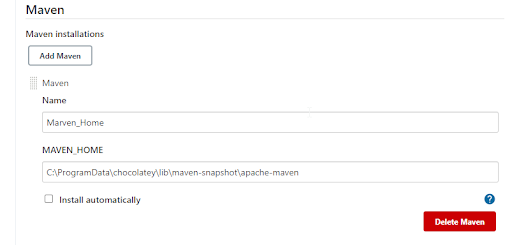
Jenkins should be configured with the proper JDK and Maven paths in the Global Configurations.
Manage Jenkins -> Global Tool Configuration
JDK
Maven
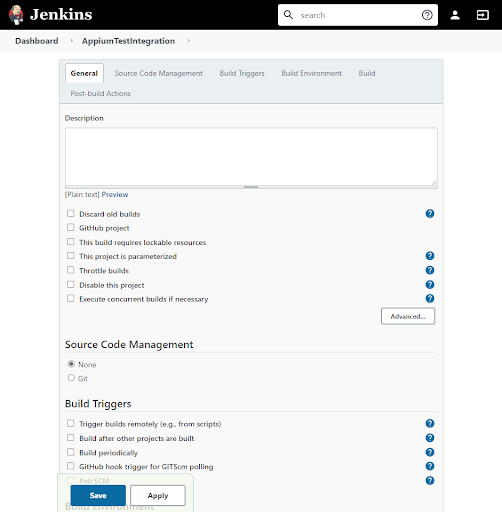
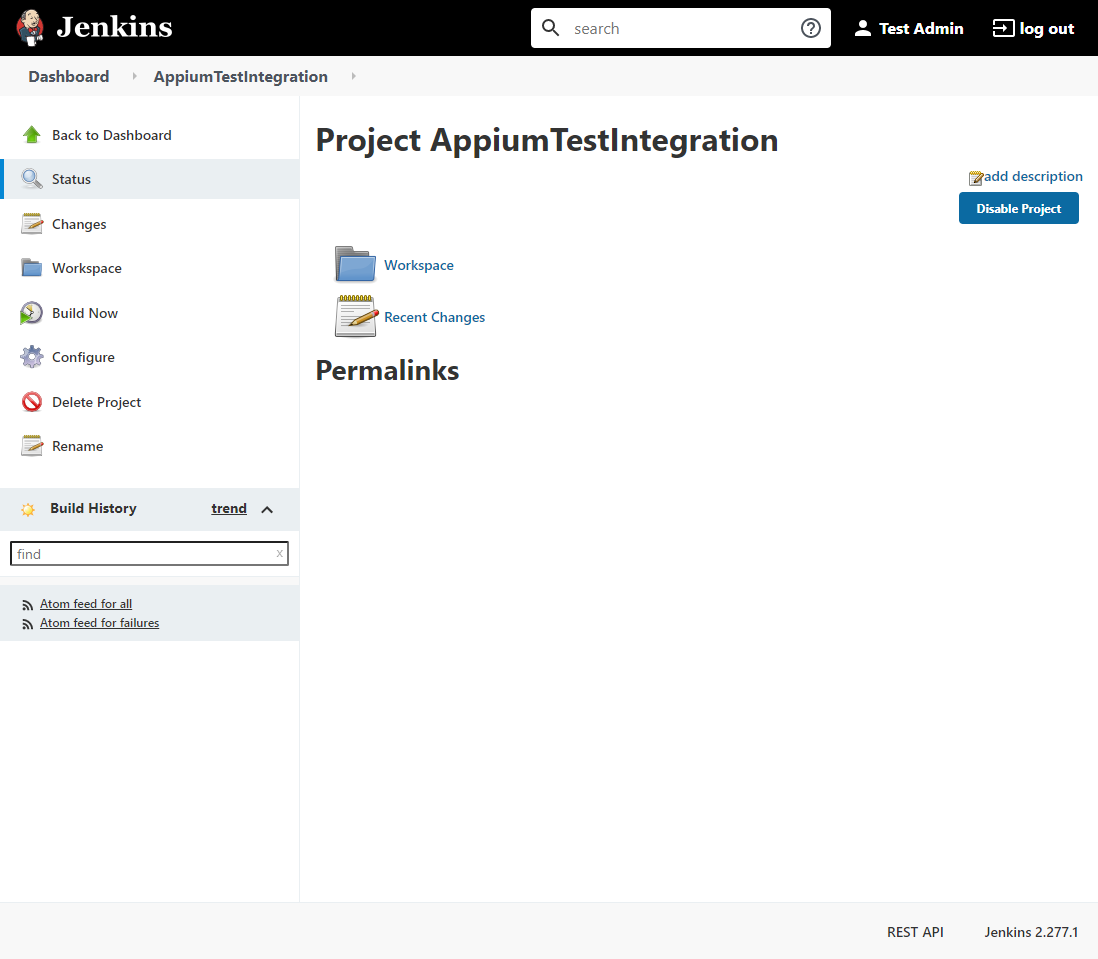
Log in to the Jenkins Server and Click on “New Item.”
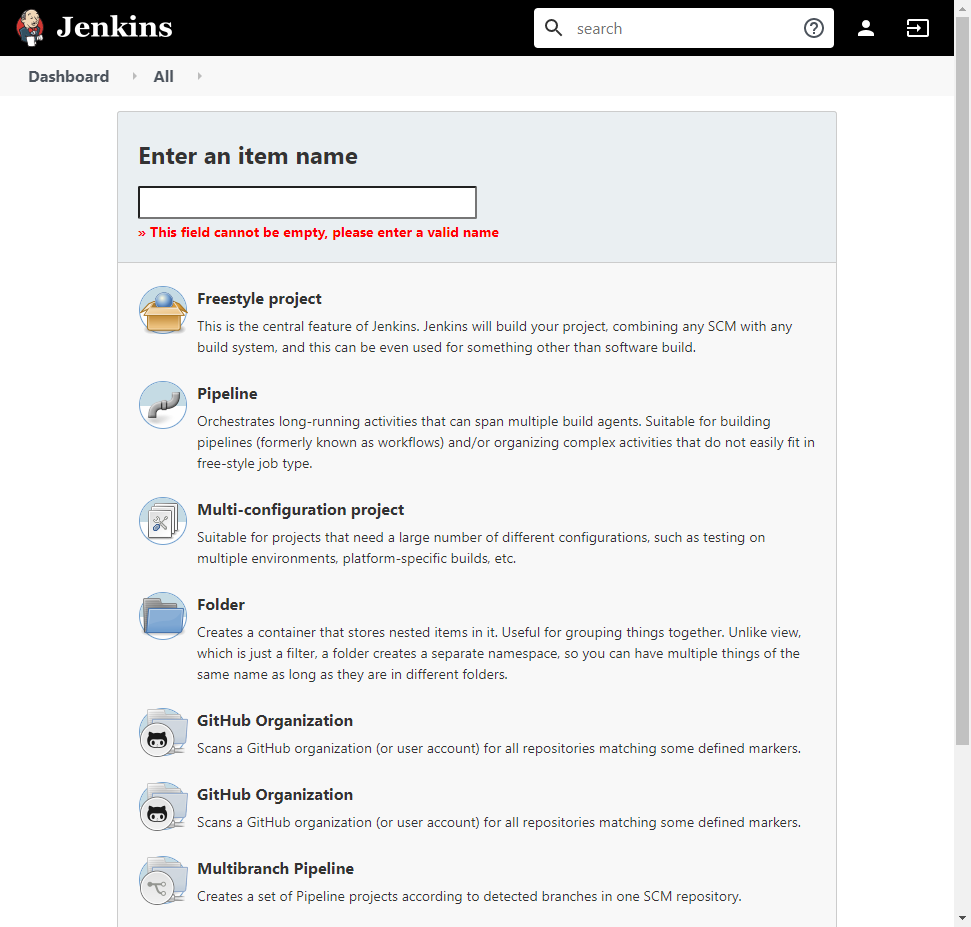
Then, select the “Freestyle project” and enter a name for the project. We will name the project “AppiumTestIntegration” for this instance, and then click the OK button to create the project. After that, we will be directed to the job configuration page.
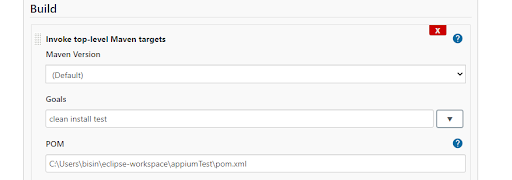
Scroll down to the Build section and select the “Invoke top-level Maven targets.”
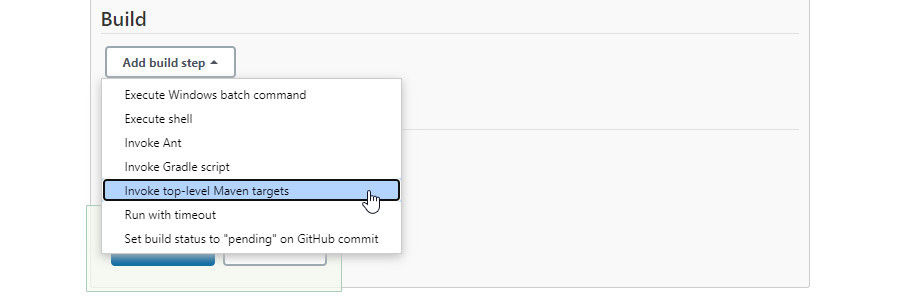
It will create an “Invoke top-level Maven targets” section within the Build section. In the “Goals” text box, enter “clean install test”.
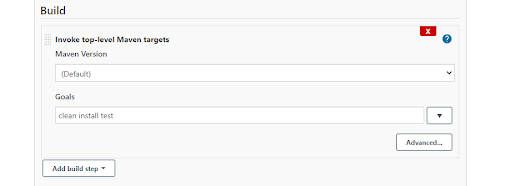
Then, click on the “Advanced…” button, and it will provide the option to include additional settings for our build.
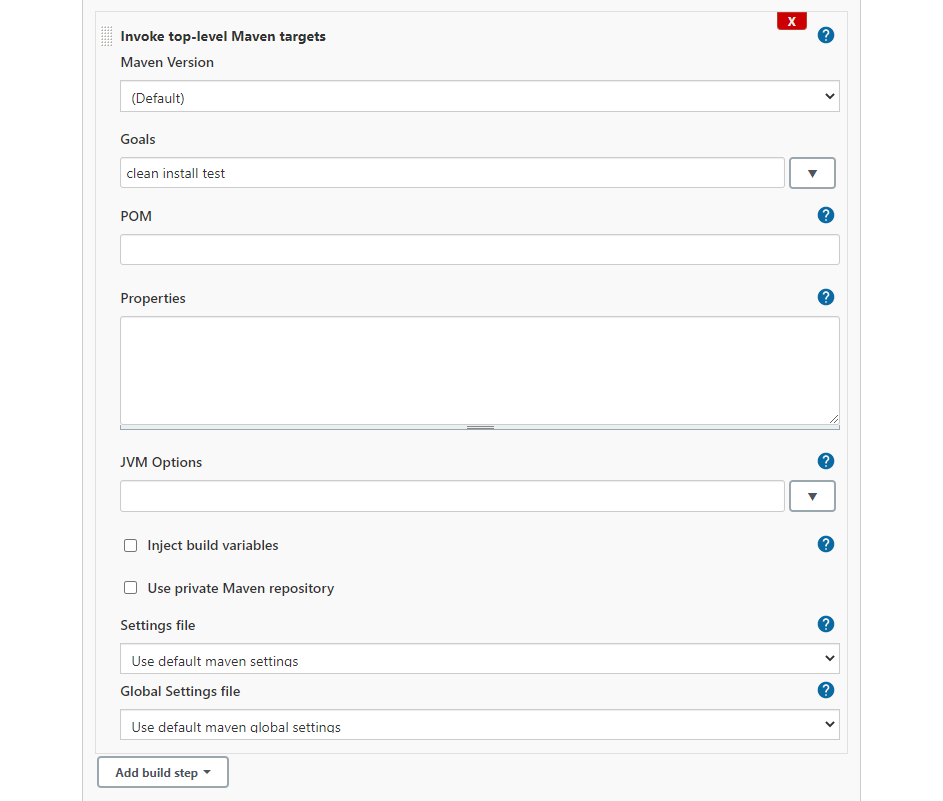
In the advanced section, there’s the option to define a POM file, and it’s the pom.xml file in the appiumTest project. We have to provide the path to the pom.xml file of the project. The easiest way to find the correct path is by right-clicking on the pom.xml file in Eclipse IDE and clicking on “properties” to get all the file properties.
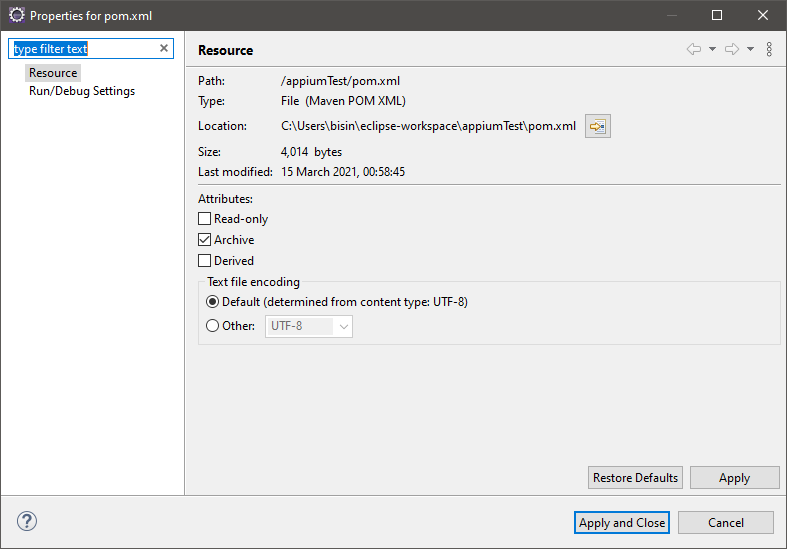
Use the path in the “Location” section and populate the POM text box of Jenkins with the file location.
Finally, save the job configuration, and you will be directed to the newly created “AppiumTestIntegration” project.
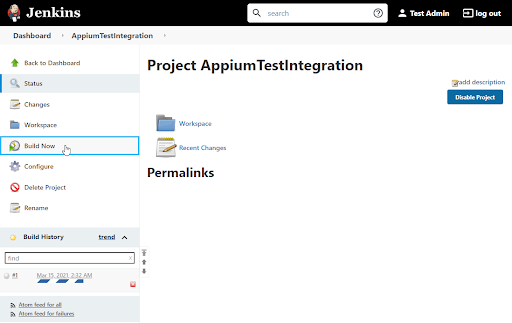
The next step will be to start the build process. To do that, click on the “Build Now” command, and Jenkins will start building our project using the defined pom.xml file.
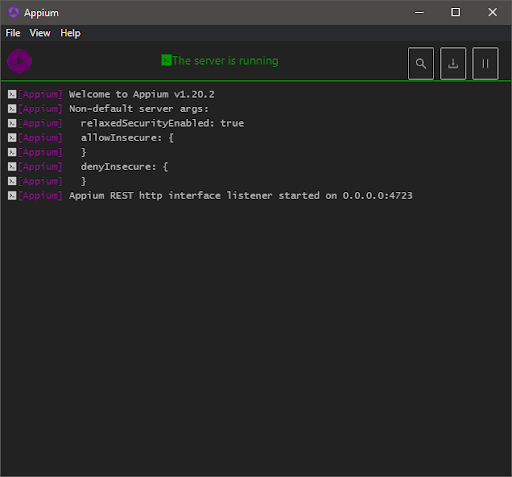
NOTE – The Appium server must be running in the background before starting the build.
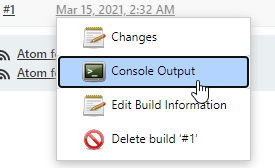
Click on the ongoing build and select the “Console Output” option to view the console output of the project build.
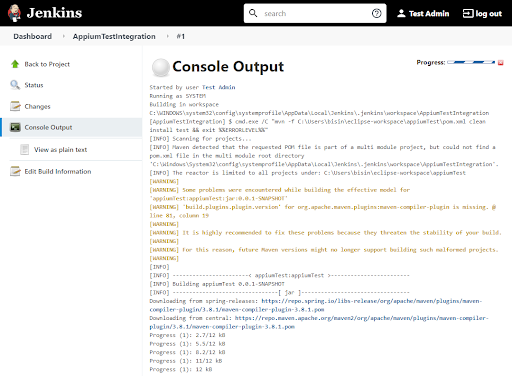
The output will contain logs for the complete build process, as shown below.
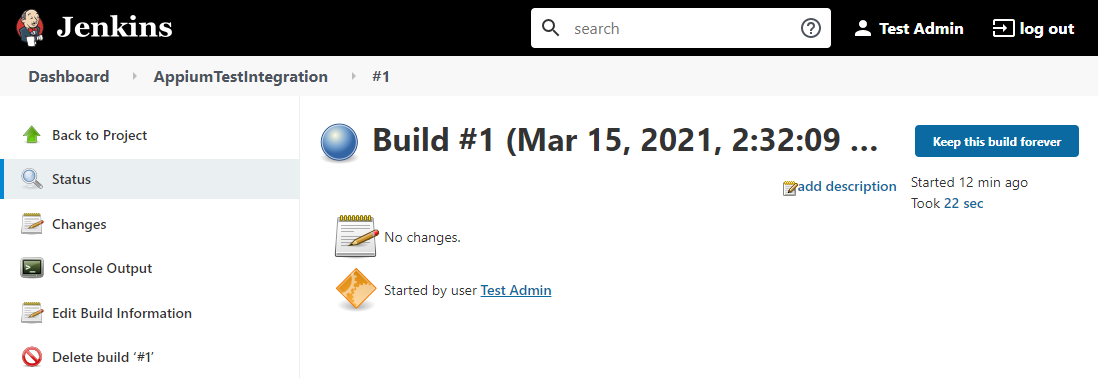
If the build is successful, Jenkins will provide successful build information in the Project screen.

Build Information:
That’s it! Now you have successfully integrated an Appium based Android test to a Jenkins project.
In this article, we have covered how to integrate an Appium-based test into a CI/CD process using Jenkins. Integrating multiple tools and technologies requires a complex setup process. However, it will result in a more streamlined development and deployment experience that will assist any software development team in practicing agile concepts.
Looking to make the move to automation testing with Appium?
")